Glutes 101: Where They Are and How to Use Them

Glutes 101: Where They Are and How to Use Them

Today, we dive into the often underestimated and overlooked powerhouse of the body—the glute muscles. Yes, those muscles that are the real MVPs in shaping and supporting our bottoms. 

How many times have you heard a fitness instructor or physiotherapist say “use your glutes” or “you know what your problem is… you just don’t use your glutes”. But when does someone actually show you where your glutes are, how to activate them, and what they do? 

Sometimes we forget that the simplest knowledge can be the most powerful, so today we are breaking it down. Grab your water bottle, put on your favourite workout playlist, and let's talk glutes!

Location, Location, Location: Where Are Your Glutes?

First things first, where exactly are these glutes we're talking about? Well, they're the group of muscles in your buttocks, made up of three individual muscles: the gluteus maximus, gluteus medius, and gluteus minimus. 

Gluteus Maximus: The Powerhouse of Extension

This is the biggest of the three glute muscles and also the most powerful. It is the one that sits right on the surface and can give you the J.Lo definition. Beyond having a cute peach it is also the prime mover in hip extension. Meaning when you lift your leg back behind you, your gluteus maximus is the main driver of that movement. It is important in so many daily movements, but recently with a rise in desk jobs, a lot of us don’t use this main muscle as often as we should, causing it to atrophy (or shrink). 


Gluteus Medius: The Underrated Middle Sister

Gluteus medius never receives the attention it should. It is the prime mover of hip abduction (lifting your leg to the side) and a big contributor to hip extension and rotation, as well as hip stability. A weak gluteus medius or poor activation can lead to a host of issues like back pain, IT Band syndrome, and poor hip and knee mechanics when running, walking, and squatting. When someone has a weak gluteus medius we often see a hip tilt on a single leg called a Trendelenburg sign.

This little gal needs to be worked often and in most physiotherapist opinions everyone should have an isolated hip abduction exercise in their physical fitness routine. You want to keep the gluteus medius strong and healthy. 


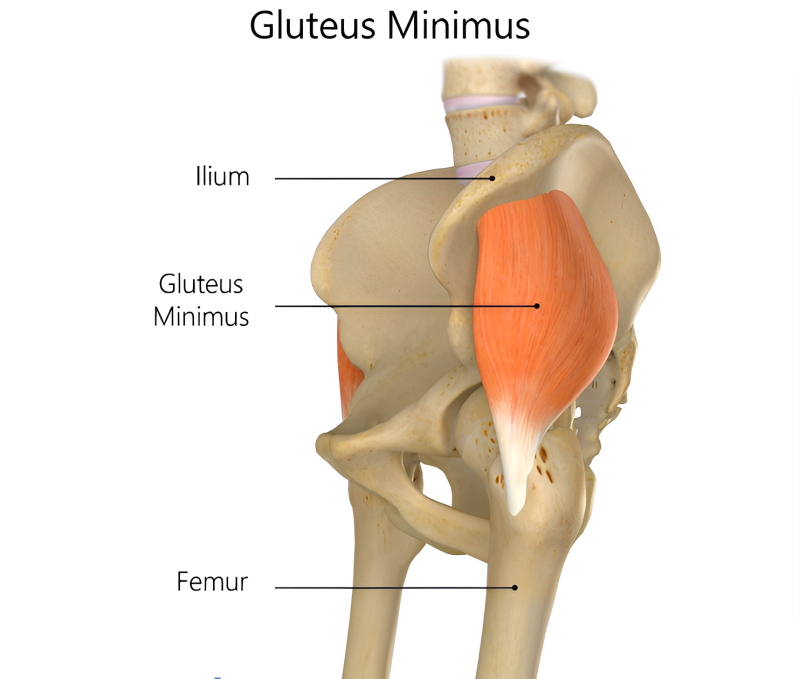
Gluteus Minimus: The Happy Helper

Gluteus Minimus is the smallest of the glute group, and its primary job is to help with hip stability and hip abduction. Single-leg exercises tend to target this muscle group the most and it is happy to tag along when working out the two bigger muscles in its group. 

Getting to Know Your Glutes: What Do They Do?

We touched on this a little bit above, but in a more general sense the glutes are more than just a cushy seat for your favourite chair—they're involved in a range of movements, from standing up straight, to walking, running, and even maintaining balance. Strong glutes help support your lower back, improve posture, and maintain proper hip and knee mechanics. In short, they're the unsung heroes of your body!

Activating the Power: How to Use Your Glutes

It’s time to put those glutes to work! The key to activating your glutes is to focus on engaging them during exercises, creating a stronger mind-body connection. If you aren’t used to using your glutes you may have to consciously think about it at the start. Try squeezing your glutes in a chair just to locate them first and then transfer that standing or at the top of a squat. These simple actions can help strengthen and tone these muscles over time and help create a strong connection. 

Glute Exercises to Get Started: 

Now, the fun part—let's explore some exercises that will fire up the glutes:
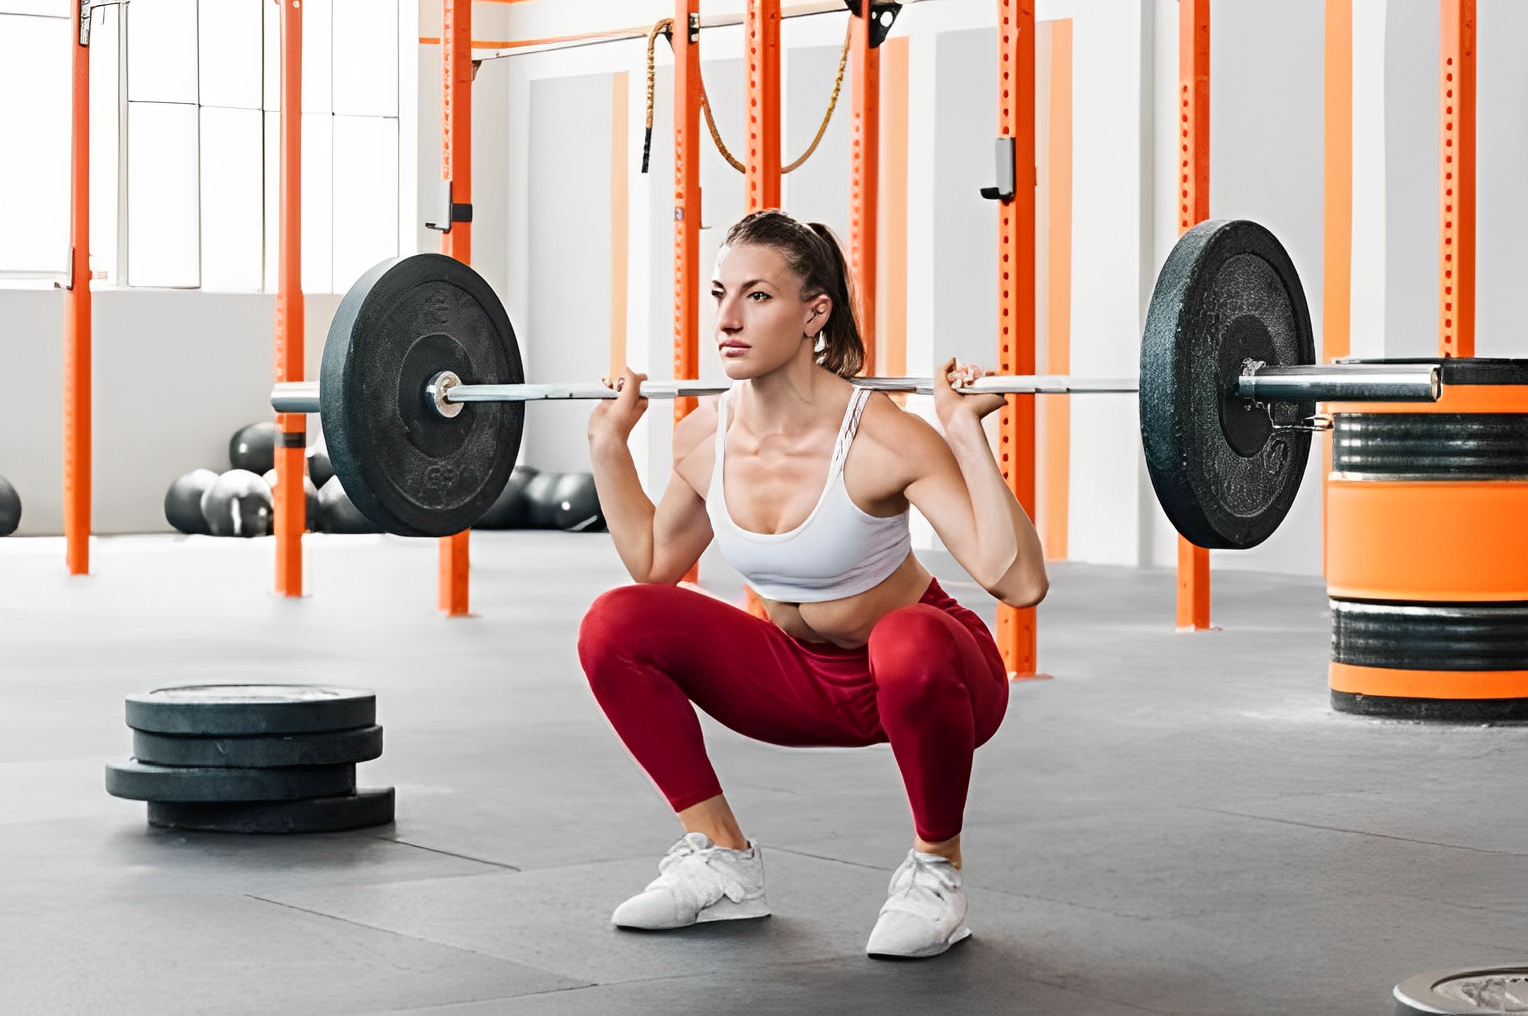
  • Squats:

    • Stand with your feet shoulder-width apart.

    • Lower your body as if you're sitting back into a chair, keeping your chest up and knees behind your toes.

    • Squeeze your glutes as you return to the starting position.

Reverse Lunges:

  • Take a step backwards with one foot, lowering your body until both knees are bent at a 90-degree angle.

  • Push off the back foot, engaging your glutes, and return to the starting position.

  • Repeat on the other leg.

  • Glute Bridges:

    • Lie on your back with your knees bent and feet flat on the floor.

    • Lift your hips toward the ceiling, squeezing your glutes at the top.

    • Lower your hips back down and repeat.

Monster Walks:

  • Start a band around the arches of your feet or ankles.

  • Take small steps in a lateral direction, keeping tension on the band

  • Try 10 steps to the left and 10 steps to the right.

  • Resisted Hip Abduction

    • Stand on a single leg with a band around your ankles

    • Lift your non-standing leg out to the side, inline with your standing leg

    • Lower the leg back to the starting position and repeat

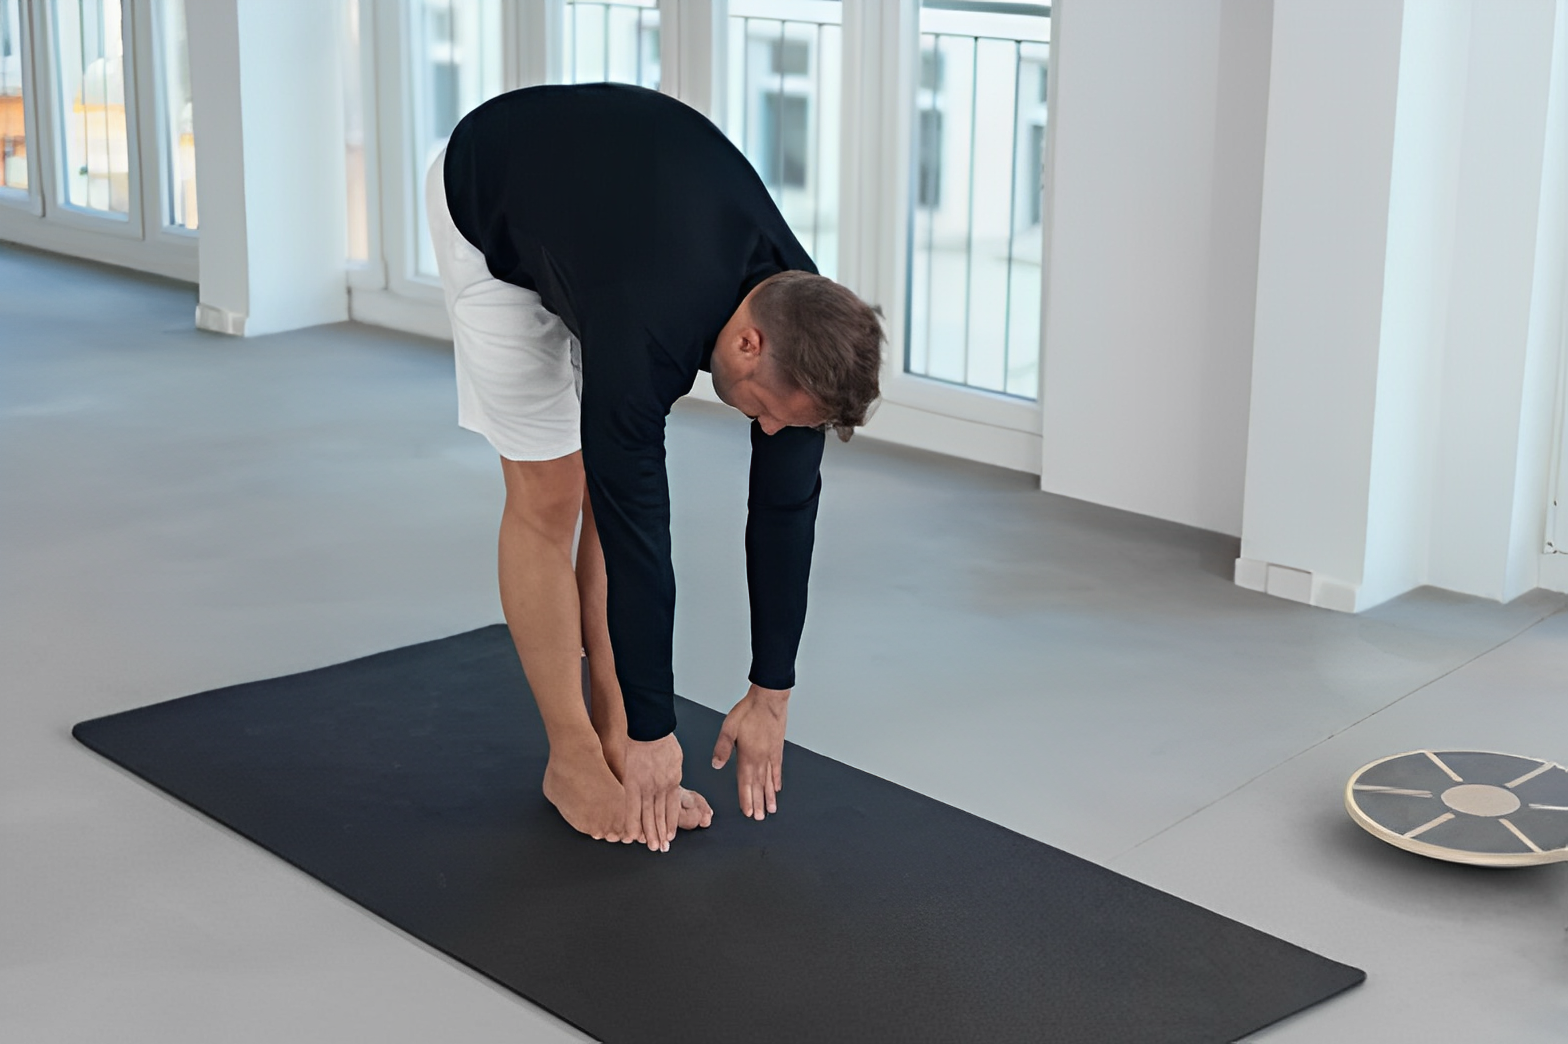
  • Single Leg Deadlifts

    • Standing on a single leg, hinge forward at your hip

    • Lift the back leg at the same rate as you tilt forward

    • Return to an upright position by squeezing your glutes 

Keep the sets and reps of all exercises simple, begin with 3 sets x 10 reps (on each side - if the exercise is on a single leg), and progress to 12-15 reps once you are able.

Incorporate some or all of these exercises into your routine, and your glutes will thank you later. Remember, consistency is key, so make sure to gradually increase intensity and challenge yourself as you progress.

If you want something more individualized or would like someone to show you technique and walk you through the paces, book an appointment with one of our clinicians. You can do this by phone at 250-723-5112, or online at https://www.portalberniphysiotherapy.ca

Unraveling the Knot: Understanding, Exercising, and Preventing Tension Headache

Unraveling the Knot: Understanding, Exercising, and Preventing Tension Headache

Tension headaches are like uninvited guests who show up at the most inconvenient times, wrapping our heads in a vice-like grip. These headaches, often characterized by a dull, persistent pain, are a common affliction in our stress-laden lives. In this blog post, we'll delve into the causes of tension headaches, explore exercises that can provide relief, and discuss proactive measures to prevent these unwelcome visitors.

Understanding the Culprits: What Causes Tension Headaches?

Tension headaches are often the result of muscle contractions in the head and neck regions, typically triggered by stress, anxiety, or poor posture. Prolonged periods of staring at screens, inadequate sleep, and dehydration can also contribute to the onset of tension headaches. Understanding these triggers is the first step in effectively managing and preventing these headaches.

Exercise Treatment

Exercise can be a powerful tool in alleviating tension headaches. Engaging in activities that promote relaxation and release muscle tension is key. Here are a few exercises that may help:

1. Neck Stretches: Gently tilt your head to one side, bringing your ear toward your shoulder until you feel a stretch on the opposite side of your neck. Hold for 15-30 seconds, then switch sides. Repeat as needed throughout the day.

2. Shoulder Rolls: Sit or stand with your shoulders relaxed. Slowly roll your shoulders forward in a circular motion for 10-15 seconds, then reverse the direction. This simple exercise can help release tension in the shoulders and upper back.

3. Massage ball: If you get good relief from massage work, you may benefit from a massage ball to continue these techniques at home. A massage ball relieves tension by placing pressure on a muscle allowing it to relax. This is particularly useful in the sub-occiptal muscles at the base of the skull. Below is a great video showing you how to use a massage ball correctly for tension headaches.

4. Yoga: Yoga emphasizes gentle, flowing movements that can help relax muscles and reduce stress. Incorporating these practices into your routine may contribute to headache prevention. Below is a great Youtube video so you can get started at home.


Preventing Tension Headaches

Prevention is often the best medicine. Here are some lifestyle adjustments to help prevent tension headaches:

Manage Stress: Identify stressors in your life and develop healthy coping mechanisms, such as mindfulness, meditation, or engaging in hobbies. The Headspace App is a great place to start mindfulness meditation if you haven’t used it already. This app walks you through a variety of mindfulness practices to help relieve stress and cope with the anxieties of everyday life.

Maintain Proper Posture: Be mindful of your posture, especially when sitting for extended periods. Keep your spine straight, shoulders relaxed, and take breaks to stretch and move. We advise our clients to use a phone timer or download a posture app that reminds you to check your posture. Ideally you take breaks every 30-60 minutes to move around. This can include coffee breaks, switching from a seated to standing position (with a sit to stand desk), or doing physiotherapy stretches or strengthening exercises.

Desk Ergonomics: To ensure that your desk set up is not contributing to your tension headaches , it's important to check your ergonomics. At Port Alberni Physiotherapy, our physiotherapists can conduct on-site Ergonomic Assessments to identify any issues and suggest solutions. Alternatively, you can schedule an appointment to discuss potential changes that can be made to improve your workplace ergonomics. There are also many resources online to do an ergonomic scan at home and make quick fixes.

Stay Hydrated: Dehydration can contribute to tension headaches, so make sure to drink an adequate amount of water throughout the day.

Prioritize Sleep: Establish a consistent sleep routine and aim for 7-9 hours of quality sleep each night.


To live a tension headache-free life, it is essential to understand the causes of tension headaches, practice appropriate exercises, and take preventive measures. By making minor lifestyle modifications and integrating relaxation methods into our daily routine, you can relieve the knots of tension headaches. If you need more assistance we strongly recommend consulting a healthcare professional for a thorough assessment and personalized treatment plan, you can do this through our website www.portalbneriphysiotherapy.com or by calling 250-723-5112.

The PEACE Method - The New Approach to Injury Management

The PEACE Method - The New Approach to Injury Management

After an injury, we often resort to the RICE or PRICE method, which involves resting, icing, compressing, and elevating the injured area. However, recent evidence-based updates suggest that avoiding anti-inflammatory medication is crucial during the first few weeks of healing. The acronym PEACE is now being used in injury management, and here is what it’s telling us:

Protection: The protection aspect of the PEACE method emphasizes the importance of protecting the injured area without completely immobilizing it. This may involve using braces or splints, which provide stability without restricting all movement.

Elevation: Similar to the RICE method, elevating the injured area can help reduce swelling and improve blood flow.

Avoid Anti-Inflammatory Agents: Unlike RICE, the PEACE method advises against the use of anti-inflammatory medications during the initial stages of injury, as inflammation is considered part of the natural healing process. Using anti-inflammatories may interfere with the body's ability to repair itself.

Compression: The PEACE method recommends a modified approach to compression. Instead of tight compression that might restrict blood flow, gentle compression may be used to provide some support without inhibiting the body's healing mechanisms.

Education: Educating the individual about the nature of their injury, potential recovery timelines, and the importance of active management is an essential aspect of the PEACE method.

Even though injury management techniques are constantly changing as new research is being conducted, it is important to put the newest methods into practice. At this point in the medical literature, if you use the PEACE method you are giving yourself the best chance at a full and healthy recovery.

Watch this video on the PEACE Method to learn more:

Understanding Whiplash: Causes and Effective Treatment

Understanding Whiplash: Causes and Effective Treatment

Whiplash, or Whiplash Associated Disorders (WAD) is a common injury treated by healthcare professionals. We commonly see these injuries in a clinical setting after a car accident, falls, or sports injuries, but many people are unaware of what causes whiplash or how to effectively treat it. In this blog will answer the common questions surrounding whiplash and suggest effective exercises that you can start at home. 

What is Whiplash?

Whiplash refers to an injury of the neck from a rapid acceleration and deceleration movement. This generally happens when the neck and head move forwards and backwards quickly and unexpectedly with a high amount of force. This forceful and rapid motion can strain or damage the soft tissues in the neck, primarily the muscles, tendons, and ligaments. Although in rare cases nerve damage, fractures, and dislocations can occur. 

When treating whiplash, your healthcare practitioner will typically assign a grade to the injury related to the severity of symptoms. Here are the four different grades of whiplash:

Grade 1: Complaint of neck pain, stiffness, and tenderness only. No physical signs are present.

Grade 2: Complaint of neck pain and stiffness, along with musculoskeletal signs. Musculoskeletal signs include a noticeable decrease in neck range of motion and point tenderness.

Grade 3: Complaint of neck pain and stiffness, along with neurological signs. Neurological signs include sensory deficits, weakness, and a loss or decrease in reflexes.

Grade 4: Complaint of neck pain and stiffness, along with a fracture or dislocation.

Most whiplash injuries are a result of a soft tissue injury and are classified as a Grade I or II. These types of whiplash injuries can be successfully treated by rest, education, and physiotherapy.

Grade III and IV whiplash injuries are possible, but much more rare and require different intervention. If you are experiencing changes in neurological signs or suspect you may have a fracture due to a whiplash injury please speak with your GP or visit an emergency department right away.

Causes of Whiplash: 

The primary cause of whiplash is any sudden, forceful movement that hyperextends and hyperflexes the neck. Common scenarios include:

  • Car Accidents: Rear-end collisions are a notorious trigger for whiplash. The abrupt deceleration of the vehicle can jolt the neck forward and backward.

  • Sports Injuries: Contact sports, especially those with a high risk of collisions or tackles, can lead to whiplash. It's crucial for athletes to use protective gear and proper technique.

  • Falls: A sudden slip or fall can result in whiplash, especially if the head and neck snap backward upon impact.

  • Amusement Park Rides: The rapid and unpredictable movements on certain amusement park rides can subject riders to forces that may cause whiplash.

  • Cycling Accidents: Falling off a bike, performing a quick sudden stop at high speed, or a collision with a vehicle can cause whiplash. 

How Long Does Whiplash Last? 

The duration of whiplash can vary significantly from person to person, depending on several factors, including the severity of the injury, the individual's overall health, and the effectiveness of treatment. In general, whiplash symptoms can last anywhere from a few days to several weeks or even months. Here's a rough timeline of how whiplash symptoms may progress:

  • Acute Phase (0-72 hours): In the immediate aftermath of the injury, you may experience pain, stiffness, and swelling in the neck and surrounding areas. Symptoms are typically at their worst during this phase.

  • Subacute Phase (3 days to 3 months): Most people start to see improvement in their symptoms within the first few weeks, but it's not uncommon for some symptoms, like stiffness and occasional pain, to persist for several months.

  • Chronic Phase (3 months and beyond): If whiplash symptoms continue beyond three months, they are considered chronic. Chronic whiplash can be more challenging to treat, but with the right interventions, many individuals still experience improvement over time.

It's essential to note that seeking early and appropriate treatment can significantly influence the duration and severity of whiplash symptoms. Physiotherapy, massage, and even acupuncture are valuable treatment options that can help speed up recovery and reduce the risk of chronic symptoms.

It's also important to follow your healthcare provider's recommendations, adhere to your prescribed treatment plan, and actively participate in any exercises or therapies recommended for your recovery. If your whiplash symptoms persist or worsen, it's crucial to consult a healthcare professional for further evaluation and adjustments to your treatment plan. Each person's experience with whiplash is unique, so the duration of symptoms can vary widely.

Treatment for Whiplash

Common treatments for whiplash aim to alleviate pain, reduce inflammation, improve neck mobility, and promote overall recovery. The specific treatment plan may vary depending on the severity of the injury and individual needs. 

It is important to keep your body moving and generally active after a whiplash injury. Doing gentle exercise and returning to work as soon as you feel able typically helps recovery. You do not need to wait until you are 100% better to return to a somewhat normal routine.

Going for a gentle walk or completing your household chores is an easy way to incorporate movement at the start of your recovery.

It is important to start gentle range of motion exercises as early as possible. This will help decrease joint stiffness. This may be uncomfortable at first, but will improve with time and practice. It is helpful to push into a bit of pain to start as this will improve your range of motion and get you back to your normal self.

Pain should not be avoided in the early stages as long as it is mild. You won’t cause more or prolonged damage by doing gentle exercises during the early phases of recovery. Pain in this case, is a reminder that you’ve had an injury that you need to be gentle.

Here is a list of common treatments to aid in whiplash recovery:

  • Rest: Initially, resting the neck and applying ice or heat can help alleviate pain. This is recommended for the first 72 hours when pain is typically at its worst. 

  • Physical Therapy: This is a cornerstone of whiplash treatment. Physiotherapists can create a customized exercise program to improve neck strength and flexibility.

  • Manual Therapy: Hands-on techniques like massage and joint mobilization can help alleviate muscle tension and improve mobility.

  • Heat Therapy: Heat can promote blood flow and relax tense muscles, easing discomfort.

  • Pain Medication: In some cases, over-the-counter or prescription pain relievers may be recommended to manage pain and inflammation.

  • Education: Patients are educated on proper posture, ergonomics, and exercises to prevent future injuries.

Exercises for Whiplash

These exercises are meant for the early stage of whiplash and are simple but effective. They are meant to improve your range of motion and build foundational muscle strength so you can progress to harder exercises with your physiotherapist. You can complete these exercises 2-3 x day for the first 10 days to 2 weeks after injury.

It is important to note that once these exercises become too easy, it is important to have exercise progressions. Exercise progressions help build muscle strength to its original baseline level prior to injury and will prevent re-injury once you return to your normal routine.

  • Neck Range of Motion 

    You want to complete all 6 ranges of motion to the best of your ability. Slight pain and discomfort is okay. On a pain scale you don’t want to go above a 4/10.

    You may find extension and rotation particularly difficult - go slow and be gentle.

    Complete 2 sets x 10 repetitions of each range of motion, taking breaks as necessary.

  • Isometric Neck Strengthening 

    Complete all ranges of motion on each side only pushing as hard as you can tolerate

    Complete 3-5 reps x 5- 10 second holds in each position

    Make sure your neck stays in a neutral position when applying pressure

In summary, whiplash is a neck injury resulting from rapid and forceful movement, often caused by car accidents, sports injuries, falls, or other abrupt incidents. While it can be painful and uncomfortable, there are effective treatments available, with rehabilitation playing a crucial role in the recovery process.

If you or someone you know has experienced whiplash, we strongly recommend consulting a healthcare professional for a thorough assessment and personalized treatment plan, you can do this through our website www.portalbneriphysiotherapy.com or by calling 250-723-5112.

The Healing Power of Clinical Pilates in Rehabilitation

The Healing Power of Clinical Pilates in Rehabilitation

Clinical Pilates is known to have many benefits when recovering from injury or improving chronic pain. The combination of controlled movements, mindful breathing, and focused exercises on muscular strength and alignment can improve a patient’s body awareness and overall mind-body connection. Whether you're seeking post-injury rehabilitation, pain management, or a path to lifelong wellness, Clinical Pilates offers a gentle, yet powerful approach. 

Read along to discover the many benefits of Clinical Pilates and whether or not it is right for you.


The Core of Rehabilitation

Rehabilitation is all about restoring movement, strength, and function to those who've experienced injuries or health conditions. As clinicians, we understand the significance of personalized, well-rounded treatments that cater to each individual's unique needs. Enter Clinical Pilates – a method that aligns seamlessly with this philosophy.

The Power of Controlled Movements

At the heart of Clinical Pilates lies a focus on controlled movements that engage the body's core muscles. These gentle yet precise movements aid in retraining muscle activation patterns, enhancing stability, and improving overall body awareness. For someone navigating their way through rehabilitation, these controlled movements can be transformative.

Tailored to Your Needs

One of the most remarkable aspects of Clinical Pilates is its adaptability. Whether you're recovering from a sports injury, surgery, or managing chronic pain, a skilled practitioner can customize the exercises to suit your specific condition. This tailored and individualized approach not only accelerates your recovery but also helps prevent further injuries by addressing underlying weaknesses.

Mind-Body Connection

The mind-body connection is an essential component in the rehabilitation process, especially when dealing with chronic pain. Pain is not solely a physical sensation; it's also influenced by psychological factors. Clinical Pilates incorporates mindfulness and controlled breathing techniques that help manage stress and anxiety – both of which can exacerbate pain. By promoting relaxation, positive mental state in combination with body awareness and proper posture, Clinical Pilates helps develop a stronger mind-body connection and effectively reduces pain. 

Gradual Progression

One of the keys to successful rehabilitation is gradual progression. Clinical Pilates excels in this regard by offering a range of exercises that can be modified to accommodate various levels of fitness and recovery. Clinical Pilates provides a structured framework that allows individuals to start at a level that aligns with their current capabilities and gradually advance as their pain tolerance and strength improve. Whether you're just beginning your journey or well on your way to recovery, there's a suitable Pilates routine for you.

Building Long-Lasting Habits

One of the most rewarding aspects of using Clinical Pilates as a form of treatment, is witnessing patients transition from rehabilitation to maintaining an active, healthy lifestyle. Clinical Pilates equips individuals with valuable tools to sustain the progress they've made. The exercises learned during rehabilitation can be seamlessly integrated into daily routines, ensuring that the benefits of Pilates extend far beyond recovery. There is also the chance to transition to group classes, making it more affordable, fun, and social - adding to its longevity. 

Extended Health Care Coverage 

Clinical pilates is often eligible for coverage under extended healthcare plans. Some clinicians are certified to provide Clinical Pilates and can bill within your extended coverage. If you have questions and want to know if you are eligible, you can always contact the clinic for more guidance.  

Incorporating Clinical Pilates into rehabilitation is a decision that can positively impact your journey to recovery. The combination of controlled movements, tailored exercises, and mindfulness can bring about comprehensive healing.

If you want to learn more about clinical pilates or book an appointment, reach out to us at 250-723-5112. You can also book an appointment with one of our clinicians at Port Alberni Physiotherapy, or book a class at our onsite yoga and pilates studio - Yellow Door Studio.

Tennis Elbow: Understanding and Treating the Overuse Injury

Tennis Elbow: Understanding and Treating the Overuse Injury

Lateral Epicondylitis, or more commonly known as Tennis Elbow, is a common workplace and sport injury, but what actually is it? Tennis Elbow is classified as an overuse injury, which affects the tendons in the forearm, causing pain and discomfort in the outer part of the elbow. In this blog post, we will delve into the causes, symptoms, and treatment options for tennis elbow.

Causes and Symptoms:

Tennis elbow is caused by repetitive stress and strain on the forearm muscles and tendons, often due to repetitive upper limb activities such as computer use, lifting heavy loads , repetitive vibrations, and forceful wrist movements. Surprisingly, you don’t actually have to play tennis to get tennis elbow. Only 5% of people with the condition relate the injury to tennis. More commonly we see the injury in patients with repetitive one-sided movements in their occupation, such as mechanics, carpenters, electricians, gardeners, and office workers.

The primary symptom of tennis elbow is pain and tenderness on the outer side of the elbow, which can radiate down the forearm. The pain may worsen with activities that involve gripping, lifting, or wrist movements. In some cases, individuals may also experience weakness in their grip and difficulty performing everyday tasks.

Clinically, the most common complaint patients have when experiencing tennis elbow is elbow pain when lifting their purse or backpack, lifting a coffee mug, or gripping and using the steering wheel while driving.


Benefits of Physiotherapy Exercises for Tennis Elbow:

Physiotherapy exercises and treatment play a crucial role in managing and alleviating symptoms of tennis elbow. There is a lot of evidence to support gradual loading of the tendons in the elbow and wrist in combination with manual therapy such as elbow mobilizations, massage, and dry needling for clinical and cost effective outcomes. More recently, research has shown that shockwave and prolotherapy may also be effective at treating tennis elbow. If symptoms are resistant to physiotherapy treatment, surgery may be indicated.

In cases where a patient needs to use their upper limb for work purposes or performance and is unable to rest, a tennis elbow brace may also be effective. A tennis elbow brace essentially helps to offload the tendons in the elbow so they are not repetitively strained while the patient continues to complete work tasks or training. The placement of a tennis elbow brace is very important in order for it to be effective. If you are planning on using one, it may be beneficial to speak to your physiotherapist to review proper placement. 

Out of all the different treatment methods, a combination of exercise, stretching, and manual therapy seems to be the most effective. Exercises aim to strengthen the affected muscles and tendons allowing them to respond better to load, decrease inflammation, and promote healing of the injured area. As with any exercise regimen, it is essential to consult with a qualified physiotherapist or healthcare professional to ensure the exercises are appropriate for your specific condition and stage of healing. Here are some entry level and effective exercises to try at home to get started: 

1. Isometric Wrist Extension:

Rest your forearm on a table with your palm facing down.

Press your palm into the table as if trying to lift it off the surface, but keep your wrist still.

Hold this contraction for 10 seconds, then release.

Repeat 10 times on the affected side, complete 2-3 sets as tolerated

2. Eccentric Wrist Extension:

Sit on a chair with your forearm resting on your thigh, palm facing down, and your wrist hanging off the edge.

Hold a lightweight dumbbell or a resistance band in your hand and allow your wrist to drop downwards.

Then, slowly raise your wrist back to a neutral position.

Perform 3 sets of 10-15 repetitions on each side.

3. Pronation and Supination:

Hold a lightweight dumbbell or a soup can in your hand, with your forearm supported on a table.

Start with your palm facing down, then slowly rotate your forearm to bring your palm facing up (supination).

Return to the starting position and repeat the movement in the opposite direction (pronation).

Perform 3 sets of 10-15 repetitions on each side.

5. Wrist Extensor Stretch:

Extend your affected arm straight in front of you, palm facing down.

Use your other hand to gently bend your wrist downwards until you feel a stretch along the top of your forearm.

Hold the stretch for 30-45 seconds, repeating 3 times on each side.

Complete after your strengthening exercises

Tennis elbow might be a common injury, but with proper knowledge and early diagnosis, you can recover relatively quickly. Many factors contribute to the outcome and speed of recovery such as age, occupation, and consistency with exercises; However, the key lies in listening to early warning signs, gradual progression in activity, and seeking professional help when needed.

If you suspect you have tennis elbow or want to improve your technique to prevent it, consult with a qualified physiotherapist by clicking on the BOOK NOW button below. With the right approach, you can enjoy your favourite activities or bounce back to work with good outcomes. 


Benefits of Dry Needling and Intramuscular Stimulation

Benefits of Dry Needling and Intramuscular Stimulation

You may have heard the term Intramuscular Stimulation (IMS) or Dry Needling (DN) when talking about physiotherapy and rehabilitation, but what actually is it and how is it beneficial? This blog will go through the differences between the two needling practices and how they may benefit you. In the end, the hope is you’ll gain more knowledge and decide whether either form of these needling practices are right for you in your recovery journey.


Dry Needling (DN)

Dry Needling (DN) or Trigger Point Dry Needling (TPDN), is the use of a small dry needle that is inserted into a taut band of muscle or trigger point to release tension. 

Trigger points are taut bands of muscle that may occlude blood flow causing a radiation of pain in a distinct pattern. Common areas for trigger points are the postural muscles around the neck and shoulders and your glute and quadriceps muscles. At their worst, you may feel a sharp pain or severe tightness that radiates outward. 

During a Dry Needling treatment the needle may go in and out of the targeted muscle or your practitioner may move it around slightly. The goal is to accurately target a trigger point, causing a muscle “twitch” when the needle is inserted. This response will effectively cause muscle relaxation (lengthening), pain relief, and increase blood flow.


Intra- Muscular Stimulation (IMS)

Intramuscular Stimulation or IMS is a form of intramuscular dry needling focused on relieving chronic pain. This method was developed by Dr. Chan Gunn and is taught at the University of British Columbia. Dr. Gunn worked for the Worker’s Compensation Board of BC. It was here he noticed patients with taut bands of contracted muscle that stayed shortened causing chronic stress on soft tissues, nerves, and joints ultimately leading to hypersensitivity. These areas of hypersensitivity would exist well past the successful healing of an injury causing, what Dr. Gunn referred to as neuropathic pain. 

IMS was developed to target neuropathic pain by addressing the area of discomfort, but also the dysfunction of the nervous system. During IMS treatment, a sterile dry needling is inserted into taut or tender muscles at the site of pain or near the spine where the nerve that is associated with the affected muscle originates. 

Accurate insertion of a dry needle will elicit a muscle “twitch” or a dull ache, while healthy muscle will feel painless. The ache or twitch response leads to three physiological effects; muscle relaxation (lengthening of the muscle), a healing response due to the microtrauma from the needle insertion, and improved nerve signaling due to a generation of an electrical potential.


The Difference Between IMS and Dry Needling

The main difference between IMS and DN is in the approach to treatment. The method of IMS focuses on chronic pain by addressing the area of pain and also the dysfunction of the nervous system, which is why you may have needles inserted in painful muscle as well as the corresponding nerve region of your back. While dry needling, looks more at muscle trigger points and aims to release radiating muscle tension. Is there overlap of these techniques? Very much so, however one may work better for you depending on the cause of your pain.


The Benefits of IMS and Dry Needling

The benefits of these two needling practices are similar in that they:

  • Reduce Pain: This can take many forms. In many cases, the deactivation of trigger points alone can reduce pain locally; however, by improving muscle extensibility this can, take pressure off joints to reduce joint pain, or nerves to reduce radicular pain. Additionally, chemical changes within the muscle and associated nerves can block or influence the transmission of pain messages to the brain


  • Improve Muscle Extensibility: The deactivation of trigger points is mostly to thank here. By releasing taut bands found within muscle, muscled spasms can be decreased, seeing an increased range of motion. Improved joint mechanics and using the “twitch response” to our advantage can allow for improved recruitment and activation of appropriate muscles.


  • Promote Healing: By using a needle., we are creating tiny injuries in a dysfunctional muscle. The body then has an inflammatory response in the area. This is a natural healing process which stimulates healing through collagen and protein formation and can help to restore muscle function.


  • Promote Blood Flow: Trigger points cause tightness in muscles which can occlude blood flow, restricting oxygen delivery. This lack of oxygen can contribute to pain in the affected area. By using DN or IMS to deactivate trigger points in the muscle, we can reduce the barrier to blood flow and improve oxygenation.


  • Provide a Window of Opportunity: Using Dry Needling or IMS is kind of like pressing the RESET button on a muscle and nervous system. It provides a window of change where a muscle can be recruited more effectively and help re-establish movement patterns.

It is important to note, that you don’t want rely on dry needling as a stand alone treatment, but instead pair it with other physiotherapy techniques as well as appropriate home exercises to help reinforce movement patterns and repaired function.

If you are interested in either of these treatments, we have clinicians that are qualified in IMS and Dry Needling and are happy to help! Book an appointment with us online or by phone.